It's Christmas Eve here in the northeast and I wanted to log on tonight and thank everyone who has checked out and supported my blog for the past few months. One of the main reasons I started this was to share ideas and information with anyone and everyone, with no attitudes or strings attached. The positive feedback I have received has been fantastic, and I thank you all for that. I'll be spending the next few days with family and friends and will be posting again after the New Year has begun. Until then, I hope that everyone has a great holiday season.
Thank You,
N.E.V.
Friday, December 24, 2010
Sunday, December 19, 2010
Mohican State Park, Loudonville, OH

N.E.V.
Sunday, December 5, 2010
Tips on finding good gear cheap
When it comes to the outdoors, cheap and free are two of my favorite words. Much of my gear is used, handed down or bought on clearance at a big discount. All of it has served me well. Here's some ideas to find good gear discounted heavily and even sometimes free!
Family and Friends
You would sometimes be surprised what is lurking in peoples attics, garages and basements. I've had gear given to me just because a friend or relative heard I was interested in camping and outdoors and they had something they haven't used in years collecting dust somewhere. I've in turn given away extra gear I've collected to people who have needed it. Strike up a conversation about camping and the outdoors at family gatherings, parties, etc. Most people love talking about their experiences outdoors and even if they don't offer anything but their advice, you may learn something new.
Garage Sales and Flea Markets
Almost every garage sale I have ever gone too has had something that can be used in the outdoors. I've bought backpacks, camp stoves, knives, sleeping bags and cooking gear at garage sales. I've passed up great gear at yard sales that was selling dirt cheap because I already had it or didn't need it. If you've got a few hours on a Saturday, go hit a neighborhood garage sale, I wouldn't be surprised if you could find every bit of gear you needed. It may not be exactly what your looking for, but it will be perfectly serviceable.
Military Surplus Stores
I love Mil-Surp stuff. Almost all of it is well designed and made to last. I've found that U.S. Military gear to be of exceptional quality but also the most expensive. Foreign military gear is also good stuff and usually costs much less. I've found the best deals online.
Discount Stores
I am always looking through the clearance sections of all the big "mart" stores. I once bought two small pup tents (one I still use quite often) for $6.00 a piece brand new, off the clearance rack. The best time to find deals on outdoor gear is at the end of he season as most of the retailers are marking it down dramatically to get rid of it.
Dollar Stores
I love dollar stores, quite a few things I carry in my kit are bought there. Light duty rope, emergency candles, light sticks, all at a dollar each. The small LED flashlight I'm currently carrying is a dollar store item.
Thrift Stores
Thrift stores are great places to find cookware, backpacks and bags, wool blankets and clothing for the outdoors. Stop in often as the merchandise does turn over quite quickly.
Make it yourself
My favorite way to get gear! Search online for home made or diy outdoor gear. Go to your library and find books about camping written in the 1950's and 60's. Modify it and make it your own. There is a wealth of knowledge about the outdoors in old books. There are out of copyright books available online many different places.
Getting outdoors doesn't have to be expensive, If anyone else has any great ideas or places to get good gear at a reasonable price let me know. Thanks for reading and I hope our paths will someday cross in the woods.
N.E.V.
Tuesday, November 16, 2010
Bushcraft Kits
Recently, I've had a few people ask me advice about putting together their own Bushcraft/Outdoors kit. They always ask me what is in my kit. While I'm I telling them what I carry, I try to explain that kits are personal and different people will carry different items depending on what they think they will need or what they are comfortable with. I always stress that, no matter what they decide to carry, it should cover their basic needs. I also let them know that just because I carry a certain item, it doesn't mean they would necessarily carry it or use it. I've found out when I started out practicing Bushcraft, I carried way too much gear in my kit, I started paring it down a little on every trip until I carried what I considered the bare essentials. I then started adding pieces that I wanted to carry for either comfort or convenience, eventually settling on my current kit that I've been using for awhile now with little change to it. I've found that a modular approach works the best for me, starting with my basic kit and adding other gear depending on what I plan on doing. For example, a day hike means I grab my kit, add a map of where I'm going, a snack or two and head out the door. If I'm doing an overnight then it's my basic kit with a sleeping bag, some food and maybe a small tent in a larger rucksack. If I'm headed out for a multiple day trip with my family, then it's my basic kit, plenty of food, water filter, cooking stove, larger tent, extra clothes and sleeping bag in my frame pack. I'm constantly trying out new gear, testing it out to see it meets my needs but the one constant is my basic kit. So enough explanation....Here's what I carry in my kit.

1. Backpack with Compass Attached
2. 8x8 Homemade Tarp
3. Sheath Knife, Hawk, SAK and Small Saw
4. Small Monocular
5. Matches, Bag of firestarters with Lighter and Magnesium Fire Starter
6. Bushcraft Journal
7. First Aid Kit (includes bug repellent)
8. Mylar "Space" Blanket
9. Small LED Flashlight, Emergency Candle and Light Sticks
10. Small "Shammy" towel
11. 55 Gal. Trash Bag
12. Spare pair of prescription eyeglasses
13. Hacky Sack
14. Metal cup, Metal bottle, Wooden spoon and Bushcraft stool
15. 50ft Light Rope, 50ft Paracord, Various sized rope and cord cutoffs in bag
That's it... everything fits in the bag with room to spare for snacks, etc. It weighs in at about 10lbs. and I always have it with me in the woods. Thanks for reading, Hope your day is going great!
N.E.V.
Tuesday, November 9, 2010
Ultralight Bushcraft Stool Version 2.0
 After sucessfully testing the first ultralight bushcraft stool I made (See post here), I decided to make one a little sturdier. The prototype was made from denim and it had started to stretch and tear a bit. This one is made from a rectangular piece of leather, cut crossways, one side flipped and then sewed together. The corners were rounded and the pockets cut to match out of the same piece of leather. The entire thing was hand sewn then given a coat of beeswax. I did make a few changes from the original, I rounded the corners more and made the pockets a little bigger. I tried this one out on our recent family vacation and it performed even better than the original. It's made of medium weight leather, so it's not exactly ultralight...but it should last me a very long time. Thanks for reading.
N.E.V.
Sunday, November 7, 2010
Recycling Knives
I thought I'd post a tutorial on what I call recycling knives. Anytime I see decent quality kitchen knives at yard sales or thrift stores I buy them and throw them in a box in my garage until inspiration strikes. I haven't made any knives in quite a while and had a some free time on a Sunday afternoon. Normally when I recycle a knife I'll take one of the kitchen knives, reshape the blade, rework the handle a bit and sharpen it up. I don't usually get too fancy as I prefer utilitarian type knives over show pieces. This allows me to try different blade styles and shapes without spending a lot of money on knives and it's good knife making practice. This time I decided to get a little fancier and see what I could come up with. I took a few pictures with my phone as I worked on it. I did no measuring on this knife, everything was hand drawn and all measurements were eyeballed. Let get started!
Here's the knife with the pattern drawn on the blade. It's a 8" chefs knife that I bought at a yard sale for fifty cents. It's got a fairly thick stainless steel blade that seems to be decent steel.

Here's the new knife blank after using a dremel and cut-off wheels to rough it out of the chef's knife blade.

Here's the blank after coming off the grinder. I held the blade in my bare hands to make sure it didn't overheat and lose it's temper. When it started to get to hot to hold I'd back off and let the steel cool down. This is usually when you can tell if the knife you started with was made with good steel. This one happens to be a good piece of stainless.

I decided to do a little file work on the back of the blade just above where the handle will go.

Putting a quick edge profile on the blade. I don't want it sharp yet. There's still a lot of work to do and I've been known to cut myself before.

Here's the blank cleaned up a bit and drilled for a lanyard hole. I dug up a couple of pieces of black walnut scrap for a handle and a short piece from a broken aluminum arrow for a lanyard hole liner.

Glued up with 2 ton epoxy and clamped.

Out of the clamps and rough shaped with the belt sander.

After a bit more sanding and shaping.

Here it is... Final sanded, polished to a satin finish with steel wool and finished with 3 coats of neatsfoot oil rubbed into he wood. I'll give it a few more coats of oil over the next few days, but it's pretty much complete.

Came out to right around 7" total with a 3.5" blade. Total amount of time it took (not counting waiting for the epoxy to set) was about 5 hours. I just need to make up a sheath for it and give it a final sharpening. Thanks for reading and I hope to see you in the woods.
N.E.V.
Saturday, October 16, 2010
Practicing Bushcraft Skills at Home
 |
| Our Waterfall |
I recently spent some time in the City of Buffalo and as I drove around and saw building after building and highway after highway, I realized how lucky I am to live in a small, rural area. I have about an acre of land to call my own and although that may not seem like much, I'm surrounded by farms and woods and have fantastic neighbors. For years I've had an area in my yard to have campfires, hang a hammock and generally just bum around. It's big enough to try out tarp setups or pitch a tent. It's fairly private and I've occasionally spent a night out there. Part of our property has a creek running through it with a small waterfall, giving me plenty of trees, stones and water for raw materials for projects.
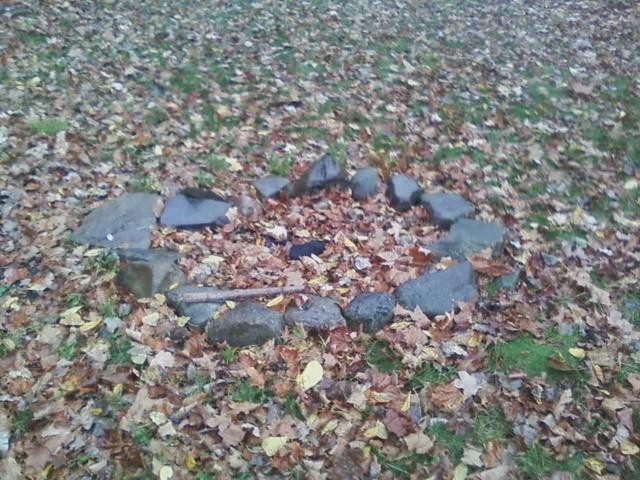 |
| Fire Ring |
Our family has been extremly busy lately, giving us little time to get out in the woods, but I always try to find a few minutes to wander down to the creek or cut a sapling or find some stone for some project I want to start. The best thing about this spot is that it allows me to practice bushcraft and outdoor skills at home. If I want to try out fire starting techniques when it starts to rain, it's just a few steps out the door. I'm sure by now my neighbors are used to me wandering around in my yard setting up tarps, chopping up sticks and other outdoor practices. I encourage everyone to find a place to practice around their home, If you live in a city you may not be able to have an open fire, but next time you light the charcoal grill, try using a method you want to practice instead of using matches or a lighter. Many times I've used the attached metal side tables on my gas grill to test a homemade alcohol stoves that I've built. Be creative and remember, even if your not in the woods, you can still practice and enjoy your skills. Thanks for reading, and may our paths someday cross in the woods.
N.E.V. |
| The view down the creek |
Tuesday, September 21, 2010
Guide to Bushcraft and Woodcraft Skills now posted
As promised in the previous post, I've published the guide I was working on. Because of it's length, I decided to add it as a separate page on this blog. Just click the tab at the top of the page entitled "Basic Guide to Bushcraft and Woodcraft". If anyone has any comments or notices any glaring mistakes or omissions, Please let me know by commenting on this post. I hope you enjoy reading it and I hope it is in someway useful to you.
Thanks,
N.E.V.
Thanks,
N.E.V.
Monday, September 20, 2010
Bushcraft and Woodcraft Basic Skills
A while back I was reading some articles about different situations where people were hurt, lost or died in the woods. The one thing that kept occurring to me in almost every story, was how unprepared most of these people were. How a simple woods kit and some knowledge and there would have been no reason to write the articles because there would have been no tragedy. After thinking about this for a few days, I decided to put some thoughts down on paper, a few simple thoughts turned into four pages, then six pages and at last count nine pages. What started out as an idea for a blog post or two, turned into is a basic guide to bushcraft skills, with an emphasis on being prepared and aware in the woods. I'm pretty sure it's almost done now, I just need to write a summary and edit the entire document a couple of dozen times, and when it's ready, I'll be posting it up on here one section at a time. So if I haven't been posting as much recently, this is one of the reasons why. Hopefully I'll post the first section in a day or two. In the meantime, Have a great week and be stay safe in the woods.
Thanks,
nev
Thanks,
nev
Sunday, September 12, 2010
Personalizing your Gear
 |
| My Northeast Voyageur mark Woodburned into spoon handle |
Wednesday, September 8, 2010
8/3 - 8/6 Adirondacks Family Trip

We decided to get away up north for the Labor day weekend. One of our favorite places to go as a family is Moss Lake in the central Adirondacks. We got started a little later than we expected and arrived at the lake around 8:00 pm, just as it was getting dark. Moss Lake is a small lake with campsites surrounding it. Some of the sites are accessed by canoe only and some are hike in, Two of the sites are handicap accessible. One of the best things about them and many other primitive camp sites in the Adirondack's is that they are free of charge, just sign the register and go. Since we got there so late, we chose the closest available hike in campsite and got the tent setup quickly which was a good thing because it immediately started raining. The next morning we woke up to the sounds of loons calling, and decided to move to another site on the other side of the lake that is right on the shore. We packed up, hiked over and got setup by late morning. We spent that entire day just hanging around camp relaxing.
 |
These guys swam by while my wife and youngest daughter were filtering some water.
 |
On a small island in the middle of the lake is an Osprey nest, and every so often we could hear the Osprey calling. My oldest daughter walked down the lake to get as close as possible without bothering it to get some pictures. Although I couldn't see them, It looked like they were feeding young ones in the nest.
 One of my favorite things about the north country are the Loons. Watching them dive and then reappear sometimes hundreds of feet away from where they started always fascinates me. Listening to their long, haunting calls is a great way to wake up in the morning. I tried to get good pictures of them but they were apparently not in a photogenic mood, staying just out of camera range all weekend.


Sunday, August 29, 2010
Walking Sticks
 |
| My walking sticks |
As with most of us, I don't like to carry anything in the woods that doesn't have mutiple uses, So as shown in the picture below, I drill a hole in my sticks at the perfect height to be used as a pole in various tarp setups. That way I'm not looking around for the right height stick and I can get a tarp setup quickly if it starts raining or getting dark out.
 |
| Tarp Setup with walking stick |
Friday, August 20, 2010
My Bushcraft Journal
 I have a collection of outdoor books. Almost all of them have some information that is useful or a technique I want to try out. Some of the books I have are in pretty rough shape (I buy most of them at library sales and garage sales) and I really don't want to take them on an outing and risk any further damage. So a few months ago I made myself a small leather bound journal and started to take notes of the things I thought were interesting or things I wanted to try the next time I was out. So now while I'm sitting at home reading a book and come across something I want to try, I immediately write it in my journal for the next time I'm in the woods. Now I am no longer carrying two or three books in my pack or trying to remember which book I saw what in. I have sections on finding direction, knots and ropework, weather lore, recipes and camp tips and crafts. I also reserve some of it for trip reports and notes.
  If it's been an eventful day, I'll sit next to the campfire and write about it while it's still fresh in my mind. When the weather has you under a tarp or in a tent for a couple of hours, It's a lot of fun to go through it and relive some of your previous trips or study up on some techniques. So give it a shot and start keeping your own bushcraft journal, see if it works for you. Have a great weekend !
Monday, August 16, 2010
8/13 - 8/14/10 Trip Report
My buddy Tim and I have been planning an overnight bushcraft trip since last summer. We finally got around to it this weekend. We headed out to some state land about 20 minutes away from my house (see the "Close to Home" post). The weather was great, we got started hiking in about 5:00 pm and decided to stop at one of the beaver ponds so Tim could test his emergency fishing kit. After catching 4 or 5 monstrous bluegills with some local bait, it was deemed successful (I will be putting a kit together for myself ASAP, Thanks Timmy!) and we headed out to make camp.
I had already scouted a couple of camping spots while day hiking with my family so we headed in that general direction. We got off trail and followed a dry creek bed for a while, hoping to find some decent water. The closest thing to a water supply we found was what appeared to be a spring fed creek puddle next to a downed tree... good enough for me. About a hundred feet up from that, Tim spotted the perfect camp spot. We got our packs off and the tents setup. Tim built a fire ring, We collected some firewood and settled down for a delicious dinner of Ramen noodles. We were both using homemade alcohol stoves and they worked just fine to prepare that culinary delight. After the dinner dishes were taken care of we started a fire, kicked back and attempted to perfect the fine art of B.S.ing around a campfire for the rest of the evening.
In the morning, my standard breakfast of coffee and bannock was supplemented with some Vienna sausages I discovered hiding in the back of my kitchen cupboard. After eating a few.... We decided that they may make a better fish bait then breakfast so we set them aside for that noble purpose. After breakfast we started trying out some different tarp setups and made up a couple of bow drill sets, making a lot of smoke but unfortunately no fire.... I'll keep trying, someday I will get a bow drill fire started. With lunchtime quickly approaching we stoked up the fire and cooked up.... More delicious Bannock!!! (Did I mention I like bannock?). Actually I discovered a secret recipe that I will only share with a few close friends on the internet..... Chicken Noodle Bannock! Take about a cup and a half of bannock mix, add one package of chicken noodle "Cup o' soup" and mix with water to make a stiff dough. Fry in a little oil in a pan over a campfire and believe it or not.... It's pretty darn good. After lunch it was time to tear down and start getting ready to head home. It was beautiful weather, excellent company and pretty cheap.... A fine trip to the woods.
 |
| One of the Monster Fish |
 |
| Ahhhhh.... Campfire |
Saturday, August 14, 2010
The Ultralight Bushcraft Stool

I like to get outdoors in all kinds of weather, In good weather I'll sit right on the ground next to a campfire, If it's cold or rainy I like some sort of seat. I like to use a stool but couldn't find one light enough so I decided to try making my own. Basically this is just a triangular piece of heavy fabric with a pocket sewn in each corner. When I get to camp, I cut three good pieces of wood about 18" - 20" long, round one end with my knife and point the other one. Lash the three together in the middle, spread out the legs, put the rounded ends in the fabric and push the sharpened ends into the ground........Taa Daa... Instant camp stool. The picture above was a prototype I quickly made up to test on my last trip. It worked great and I will now be making one a little nicer and in a heavier fabric. Have a great weekend.
Close to Home

Wednesday, August 11, 2010
Comfort in the Woods
I started getting ready for a quick overnight trip this weekend. As I gathered all my gear and spread it out on the bed, I started to question what I really needed to carry, and what I wanted to carry. Do I take my stove and cook set or leave it at home and cook over an open fire? Do I carry the water filter or just boil all my water? Should I really take a tent or would just a tarp be fine?
Most people (myself included) who head into the woods take too much gear. I'll happily carry a bit more gear to make my time there a pleasant experience but I don't want to haul a 40 pound pack if I don't need to. So I stared at all the stuff in front of me and asked myself "What's the purpose of this trip?". The answer to that question pretty much answered all the rest of the questions I had.
A buddy and I are taking this trip to hang out in the woods, practice some bushcraft skills and just generally bum around for a day or so. My basic kit was already going so that covered the bushcraft practice part of the trip. The rest of the time will hopefully be spent relaxing and hanging out so a hammock went into the bag. I'm a much happier camper when my morning coffee is ready shortly after waking up, so the stove and cook set got thrown in. I'd rather spend my time practicing with a bow drill then boiling drinking water so the filter was a go. Finally, as I have had a few people tell me that the area we are heading to had a fair share of rattlesnakes, I decided that a tent that zipped up tight might just be a good idea.
I packed everything up and set it on the scale.... 25lbs... Just about perfect, not too heavy and hopefully, containing everything I needed for a comfortable couple of days.
I'll post a trip report when I get back, I'm pretty sure there will be some item left at home that I'll wish I'd brought but I'm hoping it will only be a minor annoyance. Until then... Have a great weekend!
Monday, August 9, 2010
The Rule of 3's
Almost everyone who is into bushcraft and the outdoors knows the Rule of 3's when it comes to survival. Basically the rule of 3's state that you can survive 3 minutes without air, 3 hours without proper shelter in the cold or heat, 3 days without water and 3 weeks without any food. I take the rule of 3's a bit farther.
Whenever I am in the woods... whether it be a day hike a couple of minutes away from my house or a week long trip in the Adirondacks, I follow my own rule of three which is always carry three of each essential item. The following is my own personal "Rule of 3's" each followed by what I have been working on or carry in my kit.
Always carry 3 ways to start a fire.
I carry Strike anywhere matches, A "bic" lighter and a magnesium fire starter.
Always carry a tarp and know 3 ways to set it up.
I carry either a homemade 8x8 tarp or a 8x10 poly tarp.
Always carry at least 3 pieces of rope or cordage and know at least 3 basic knots.
The three I use the most in the woods are a Bowline, Square knot and Tautline Hitch
Know at least 3 ways to find direction.
Learn how to use a Map and Compass, Stick and shadow method or how to navigate by the stars.
Know 3 ways to find food.
Pick a plant like the Cattail and learn how to prepare it, know how to make a basic trap and carry a small fishing kit.
Always carry 3 cutting tools.
I carry a full tang sheath knife, a swiss army knife and a small tomahawk.
Know and carry at least 3 ways to purify and gather water.
Carry a metal container to boil it in, carry a filter, carry a plastic sheet for a solar still or a bandana to collect dew in the mornings.
Carry at least 3 light sources.
I carry a small LED flashlight, a couple of candles and 2 lightsticks.
Everything I carry fits into a daypack or shoulder bag, It's always ready to grab and go hit the woods. On longer trips I'll add a tent, stove\cooking kit and a blanket or sleeping bag but my basic kit rarely ever changes.
Sunday, August 8, 2010
Welcome to the Northeast Voyageur Outdoor Blog
Hello and welcome to my blog. Hopefully this will be a place to share and learn about the great outdoors. My name is Chris, I'll be adding outdoor philosophy, woodlore and bushcraft techniques. Feel free to email me at northeastvoyageur@gmail.com with any ideas, thoughts or opinions. I'm off to go canoeing but will be back to update soon.
Thanks,
Chris
Thanks,
Chris
Subscribe to:
Posts (Atom)