It's Christmas Eve here in the northeast and I wanted to log on tonight and thank everyone who has checked out and supported my blog for the past few months. One of the main reasons I started this was to share ideas and information with anyone and everyone, with no attitudes or strings attached. The positive feedback I have received has been fantastic, and I thank you all for that. I'll be spending the next few days with family and friends and will be posting again after the New Year has begun. Until then, I hope that everyone has a great holiday season.
Thank You,
N.E.V.
Friday, December 24, 2010


Sunday, December 19, 2010
Mohican State Park, Loudonville, OH

N.E.V.
Sunday, December 5, 2010
Tips on finding good gear cheap
When it comes to the outdoors, cheap and free are two of my favorite words. Much of my gear is used, handed down or bought on clearance at a big discount. All of it has served me well. Here's some ideas to find good gear discounted heavily and even sometimes free!
Family and Friends
You would sometimes be surprised what is lurking in peoples attics, garages and basements. I've had gear given to me just because a friend or relative heard I was interested in camping and outdoors and they had something they haven't used in years collecting dust somewhere. I've in turn given away extra gear I've collected to people who have needed it. Strike up a conversation about camping and the outdoors at family gatherings, parties, etc. Most people love talking about their experiences outdoors and even if they don't offer anything but their advice, you may learn something new.
Garage Sales and Flea Markets
Almost every garage sale I have ever gone too has had something that can be used in the outdoors. I've bought backpacks, camp stoves, knives, sleeping bags and cooking gear at garage sales. I've passed up great gear at yard sales that was selling dirt cheap because I already had it or didn't need it. If you've got a few hours on a Saturday, go hit a neighborhood garage sale, I wouldn't be surprised if you could find every bit of gear you needed. It may not be exactly what your looking for, but it will be perfectly serviceable.
Military Surplus Stores
I love Mil-Surp stuff. Almost all of it is well designed and made to last. I've found that U.S. Military gear to be of exceptional quality but also the most expensive. Foreign military gear is also good stuff and usually costs much less. I've found the best deals online.
Discount Stores
I am always looking through the clearance sections of all the big "mart" stores. I once bought two small pup tents (one I still use quite often) for $6.00 a piece brand new, off the clearance rack. The best time to find deals on outdoor gear is at the end of he season as most of the retailers are marking it down dramatically to get rid of it.
Dollar Stores
I love dollar stores, quite a few things I carry in my kit are bought there. Light duty rope, emergency candles, light sticks, all at a dollar each. The small LED flashlight I'm currently carrying is a dollar store item.
Thrift Stores
Thrift stores are great places to find cookware, backpacks and bags, wool blankets and clothing for the outdoors. Stop in often as the merchandise does turn over quite quickly.
Make it yourself
My favorite way to get gear! Search online for home made or diy outdoor gear. Go to your library and find books about camping written in the 1950's and 60's. Modify it and make it your own. There is a wealth of knowledge about the outdoors in old books. There are out of copyright books available online many different places.
Getting outdoors doesn't have to be expensive, If anyone else has any great ideas or places to get good gear at a reasonable price let me know. Thanks for reading and I hope our paths will someday cross in the woods.
N.E.V.
Family and Friends
You would sometimes be surprised what is lurking in peoples attics, garages and basements. I've had gear given to me just because a friend or relative heard I was interested in camping and outdoors and they had something they haven't used in years collecting dust somewhere. I've in turn given away extra gear I've collected to people who have needed it. Strike up a conversation about camping and the outdoors at family gatherings, parties, etc. Most people love talking about their experiences outdoors and even if they don't offer anything but their advice, you may learn something new.
Garage Sales and Flea Markets
Almost every garage sale I have ever gone too has had something that can be used in the outdoors. I've bought backpacks, camp stoves, knives, sleeping bags and cooking gear at garage sales. I've passed up great gear at yard sales that was selling dirt cheap because I already had it or didn't need it. If you've got a few hours on a Saturday, go hit a neighborhood garage sale, I wouldn't be surprised if you could find every bit of gear you needed. It may not be exactly what your looking for, but it will be perfectly serviceable.
Military Surplus Stores
I love Mil-Surp stuff. Almost all of it is well designed and made to last. I've found that U.S. Military gear to be of exceptional quality but also the most expensive. Foreign military gear is also good stuff and usually costs much less. I've found the best deals online.
Discount Stores
I am always looking through the clearance sections of all the big "mart" stores. I once bought two small pup tents (one I still use quite often) for $6.00 a piece brand new, off the clearance rack. The best time to find deals on outdoor gear is at the end of he season as most of the retailers are marking it down dramatically to get rid of it.
Dollar Stores
I love dollar stores, quite a few things I carry in my kit are bought there. Light duty rope, emergency candles, light sticks, all at a dollar each. The small LED flashlight I'm currently carrying is a dollar store item.
Thrift Stores
Thrift stores are great places to find cookware, backpacks and bags, wool blankets and clothing for the outdoors. Stop in often as the merchandise does turn over quite quickly.
Make it yourself
My favorite way to get gear! Search online for home made or diy outdoor gear. Go to your library and find books about camping written in the 1950's and 60's. Modify it and make it your own. There is a wealth of knowledge about the outdoors in old books. There are out of copyright books available online many different places.
Getting outdoors doesn't have to be expensive, If anyone else has any great ideas or places to get good gear at a reasonable price let me know. Thanks for reading and I hope our paths will someday cross in the woods.
N.E.V.
Tuesday, November 16, 2010
Bushcraft Kits
Recently, I've had a few people ask me advice about putting together their own Bushcraft/Outdoors kit. They always ask me what is in my kit. While I'm I telling them what I carry, I try to explain that kits are personal and different people will carry different items depending on what they think they will need or what they are comfortable with. I always stress that, no matter what they decide to carry, it should cover their basic needs. I also let them know that just because I carry a certain item, it doesn't mean they would necessarily carry it or use it. I've found out when I started out practicing Bushcraft, I carried way too much gear in my kit, I started paring it down a little on every trip until I carried what I considered the bare essentials. I then started adding pieces that I wanted to carry for either comfort or convenience, eventually settling on my current kit that I've been using for awhile now with little change to it. I've found that a modular approach works the best for me, starting with my basic kit and adding other gear depending on what I plan on doing. For example, a day hike means I grab my kit, add a map of where I'm going, a snack or two and head out the door. If I'm doing an overnight then it's my basic kit with a sleeping bag, some food and maybe a small tent in a larger rucksack. If I'm headed out for a multiple day trip with my family, then it's my basic kit, plenty of food, water filter, cooking stove, larger tent, extra clothes and sleeping bag in my frame pack. I'm constantly trying out new gear, testing it out to see it meets my needs but the one constant is my basic kit. So enough explanation....Here's what I carry in my kit.

1. Backpack with Compass Attached
2. 8x8 Homemade Tarp
3. Sheath Knife, Hawk, SAK and Small Saw
4. Small Monocular
5. Matches, Bag of firestarters with Lighter and Magnesium Fire Starter
6. Bushcraft Journal
7. First Aid Kit (includes bug repellent)
8. Mylar "Space" Blanket
9. Small LED Flashlight, Emergency Candle and Light Sticks
10. Small "Shammy" towel
11. 55 Gal. Trash Bag
12. Spare pair of prescription eyeglasses
13. Hacky Sack
14. Metal cup, Metal bottle, Wooden spoon and Bushcraft stool
15. 50ft Light Rope, 50ft Paracord, Various sized rope and cord cutoffs in bag
That's it... everything fits in the bag with room to spare for snacks, etc. It weighs in at about 10lbs. and I always have it with me in the woods. Thanks for reading, Hope your day is going great!
N.E.V.

1. Backpack with Compass Attached
2. 8x8 Homemade Tarp
3. Sheath Knife, Hawk, SAK and Small Saw
4. Small Monocular
5. Matches, Bag of firestarters with Lighter and Magnesium Fire Starter
6. Bushcraft Journal
7. First Aid Kit (includes bug repellent)
8. Mylar "Space" Blanket
9. Small LED Flashlight, Emergency Candle and Light Sticks
10. Small "Shammy" towel
11. 55 Gal. Trash Bag
12. Spare pair of prescription eyeglasses
13. Hacky Sack
14. Metal cup, Metal bottle, Wooden spoon and Bushcraft stool
15. 50ft Light Rope, 50ft Paracord, Various sized rope and cord cutoffs in bag
That's it... everything fits in the bag with room to spare for snacks, etc. It weighs in at about 10lbs. and I always have it with me in the woods. Thanks for reading, Hope your day is going great!
N.E.V.
Tuesday, November 9, 2010
Ultralight Bushcraft Stool Version 2.0
 After sucessfully testing the first ultralight bushcraft stool I made (See post here), I decided to make one a little sturdier. The prototype was made from denim and it had started to stretch and tear a bit. This one is made from a rectangular piece of leather, cut crossways, one side flipped and then sewed together. The corners were rounded and the pockets cut to match out of the same piece of leather. The entire thing was hand sewn then given a coat of beeswax. I did make a few changes from the original, I rounded the corners more and made the pockets a little bigger. I tried this one out on our recent family vacation and it performed even better than the original. It's made of medium weight leather, so it's not exactly ultralight...but it should last me a very long time. Thanks for reading.
N.E.V.
Sunday, November 7, 2010
Recycling Knives
I thought I'd post a tutorial on what I call recycling knives. Anytime I see decent quality kitchen knives at yard sales or thrift stores I buy them and throw them in a box in my garage until inspiration strikes. I haven't made any knives in quite a while and had a some free time on a Sunday afternoon. Normally when I recycle a knife I'll take one of the kitchen knives, reshape the blade, rework the handle a bit and sharpen it up. I don't usually get too fancy as I prefer utilitarian type knives over show pieces. This allows me to try different blade styles and shapes without spending a lot of money on knives and it's good knife making practice. This time I decided to get a little fancier and see what I could come up with. I took a few pictures with my phone as I worked on it. I did no measuring on this knife, everything was hand drawn and all measurements were eyeballed. Let get started!
Here's the knife with the pattern drawn on the blade. It's a 8" chefs knife that I bought at a yard sale for fifty cents. It's got a fairly thick stainless steel blade that seems to be decent steel.

Here's the new knife blank after using a dremel and cut-off wheels to rough it out of the chef's knife blade.

Here's the blank after coming off the grinder. I held the blade in my bare hands to make sure it didn't overheat and lose it's temper. When it started to get to hot to hold I'd back off and let the steel cool down. This is usually when you can tell if the knife you started with was made with good steel. This one happens to be a good piece of stainless.

I decided to do a little file work on the back of the blade just above where the handle will go.

Putting a quick edge profile on the blade. I don't want it sharp yet. There's still a lot of work to do and I've been known to cut myself before.

Here's the blank cleaned up a bit and drilled for a lanyard hole. I dug up a couple of pieces of black walnut scrap for a handle and a short piece from a broken aluminum arrow for a lanyard hole liner.

Glued up with 2 ton epoxy and clamped.

Out of the clamps and rough shaped with the belt sander.

After a bit more sanding and shaping.

Here it is... Final sanded, polished to a satin finish with steel wool and finished with 3 coats of neatsfoot oil rubbed into he wood. I'll give it a few more coats of oil over the next few days, but it's pretty much complete.

Here's the knife with the pattern drawn on the blade. It's a 8" chefs knife that I bought at a yard sale for fifty cents. It's got a fairly thick stainless steel blade that seems to be decent steel.

Here's the new knife blank after using a dremel and cut-off wheels to rough it out of the chef's knife blade.

Here's the blank after coming off the grinder. I held the blade in my bare hands to make sure it didn't overheat and lose it's temper. When it started to get to hot to hold I'd back off and let the steel cool down. This is usually when you can tell if the knife you started with was made with good steel. This one happens to be a good piece of stainless.

I decided to do a little file work on the back of the blade just above where the handle will go.

Putting a quick edge profile on the blade. I don't want it sharp yet. There's still a lot of work to do and I've been known to cut myself before.

Here's the blank cleaned up a bit and drilled for a lanyard hole. I dug up a couple of pieces of black walnut scrap for a handle and a short piece from a broken aluminum arrow for a lanyard hole liner.

Glued up with 2 ton epoxy and clamped.

Out of the clamps and rough shaped with the belt sander.

After a bit more sanding and shaping.

Here it is... Final sanded, polished to a satin finish with steel wool and finished with 3 coats of neatsfoot oil rubbed into he wood. I'll give it a few more coats of oil over the next few days, but it's pretty much complete.

Came out to right around 7" total with a 3.5" blade. Total amount of time it took (not counting waiting for the epoxy to set) was about 5 hours. I just need to make up a sheath for it and give it a final sharpening. Thanks for reading and I hope to see you in the woods.
N.E.V.
Saturday, October 16, 2010
Practicing Bushcraft Skills at Home
 |
| Our Waterfall |
I recently spent some time in the City of Buffalo and as I drove around and saw building after building and highway after highway, I realized how lucky I am to live in a small, rural area. I have about an acre of land to call my own and although that may not seem like much, I'm surrounded by farms and woods and have fantastic neighbors. For years I've had an area in my yard to have campfires, hang a hammock and generally just bum around. It's big enough to try out tarp setups or pitch a tent. It's fairly private and I've occasionally spent a night out there. Part of our property has a creek running through it with a small waterfall, giving me plenty of trees, stones and water for raw materials for projects.
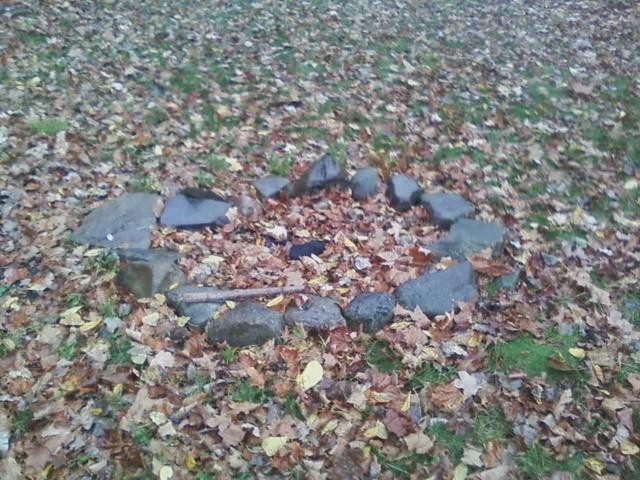 |
| Fire Ring |
Our family has been extremly busy lately, giving us little time to get out in the woods, but I always try to find a few minutes to wander down to the creek or cut a sapling or find some stone for some project I want to start. The best thing about this spot is that it allows me to practice bushcraft and outdoor skills at home. If I want to try out fire starting techniques when it starts to rain, it's just a few steps out the door. I'm sure by now my neighbors are used to me wandering around in my yard setting up tarps, chopping up sticks and other outdoor practices. I encourage everyone to find a place to practice around their home, If you live in a city you may not be able to have an open fire, but next time you light the charcoal grill, try using a method you want to practice instead of using matches or a lighter. Many times I've used the attached metal side tables on my gas grill to test a homemade alcohol stoves that I've built. Be creative and remember, even if your not in the woods, you can still practice and enjoy your skills. Thanks for reading, and may our paths someday cross in the woods.
N.E.V. |
| The view down the creek |
Subscribe to:
Posts (Atom)